

How To Change Font On Cricut Design Space
Hello Daydreamers!
Become ready, because you will master how to edit text in Cricut Design Space like a PRO by the stop of this article! I want to teach and empower you with the noesis to come up upwards with absurd ideas on your own!
Text is a huge deal in any design. Y'all can reach so much with information technology, and that's why you need to become easily-on and learn all the possibilities you have with the Cricut Machine.
Learning the basics and more avant-garde options that are available within the Cricut Blueprint Space area will allow yous to personalize things and do them beautifully!
This tutorial is quite juicy, and since I don't want yous to become lost, these are the topics I will be covering.
- How to add together text
- Editing text Menu (operation, bend, outset, font, kerning, alter spacing, advanced settings, etc.)
- Using the "Attach" tool with text in Design Space
- Thinking outside the box when editing text.
Tip: This tutorial builds upon the skills I teach in every step, so if you lot're just getting started with your motorcar, I suggest you read/follow each step.
Feel free to cheque out other links in this article, if yous want to learn more than about a certain topic.
Are you ready?
Let'southward become alee and go started!
Note: This article has been updated, therefore some pics may expect unlike if you're coming from IG, or Pinterest.
How to Add Text in Design Space
First things first!
To add text to the design surface area, you need to click on the T (text) icon located on the left panel of the canvas. Afterward clicking, a footling box will appear, and this is where you would type your text.
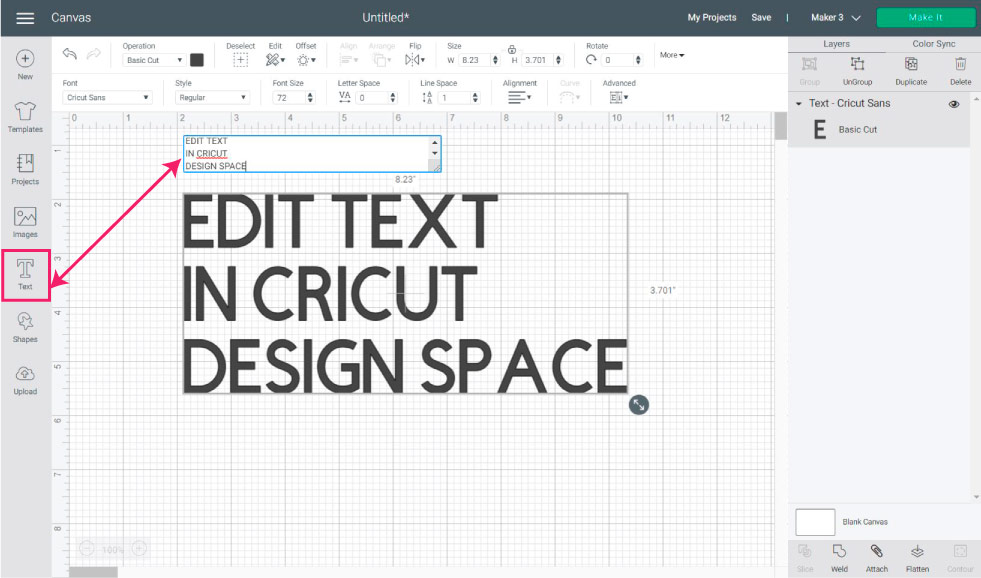
If you already typed some text, yous can easily edit it by double clicking the text itself in the sheet expanse.
When y'all add text to Design Space and select it, you'll actuate sure features or settings that otherwise would be greyed out.
Check out the post-obit screenshot and let's see what I will covering in this section.

- Operation
- Outset
- Font
- Font Manner
- Size, Letter, and Line Space
- Alignment
- Curve
- Advanced
Using Operation with Text in Cricut Space
Performance is how y'all tell your Cricut what activeness you want it to perform; depending on the machine you accept, you'll have different operations.
Here's a useful table with all the machines available and the operations you can perform.
| Operation | Machine | Maker Machines | Explore Machines | Cricut Joy |
| Basic Cut | x | x | x |
| Wavy | x | ||
| Perforate | x | ||
| Pen | ten | x | x |
| Foil* | x | x | 10 |
| Score | ten | 10 | |
| Deboss | x | ||
| Engrave | x | ||
| Print then Cut | x | x |
*Foil has fine, medium, and assuming tips with Maker and Explore machines. Nevertheless, with the Cricut Joy, at that place's only i standard foil tip.
Permit'south see from a Cricut Maker machine perspective how every operation looks when using text in Cricut Design Infinite and let's take a little conversation.
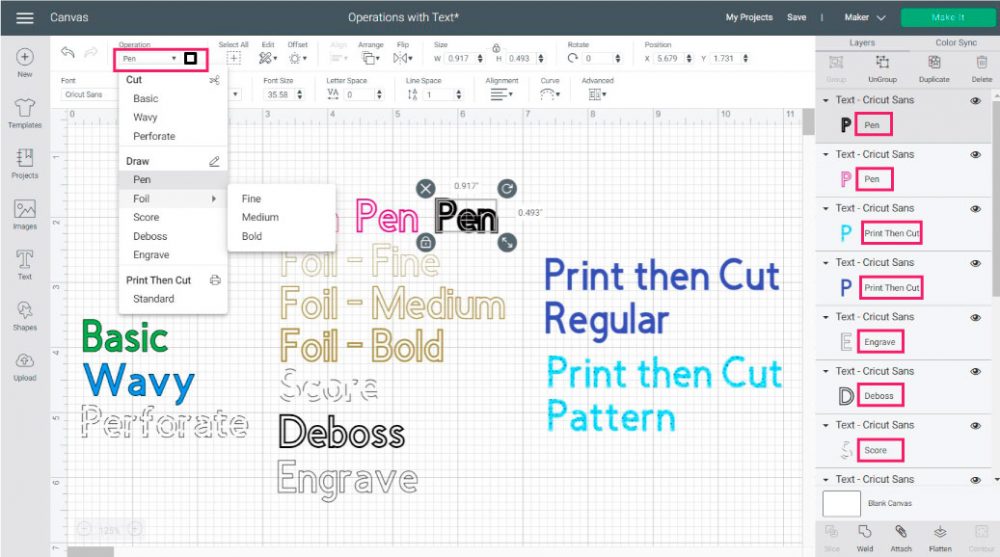
From the "Operation" drop-down carte du jour, not simply can you tell your car what action you desire it to perform, simply you tin too choose the different colors for the materials you lot want to use.
Next to "Operation," there'southward a trivial box. From this box, yous can change the colors of certain operations (Basic, Wavy, Pen, Foil, & Print and so Cutting).
With the exemption to "Bones" and "Wavy," all operations have a very distinctive appearance on the sail surface area. And some operations like Foil and Pen allow you to run across how your text would await on your project when using different sizes of pens or tips.
Impress then Cutting allows you to use patterns besides.
Lear how to use Print then Cut with Cricut.
On the Layers Panel you can also see what operation every layer is set at as well.
Beginning Text in Cricut Blueprint Space
I love adding borders, or outlines to my projects!
If you like the look of the following screenshot you volition love using the commencement tool with your text in Cricut Design Space.
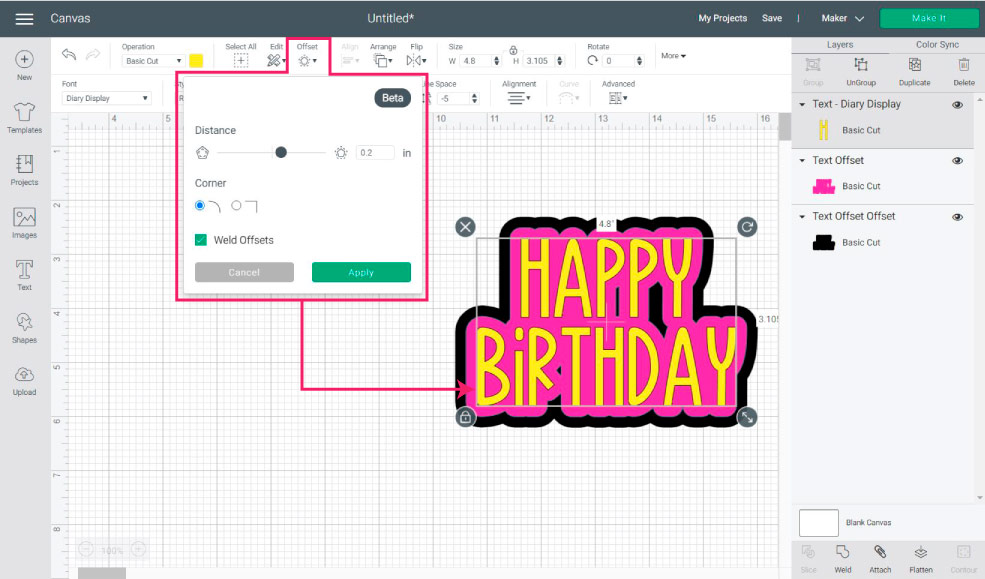
To add a proportional outline to your text, blazon it, then click on "Beginning" and motility the piddling slider to the correct. Y'all can choose between rounded and square cornerns.
If you want your start to exist a single layer, bank check "Weld Offsets," merely if yous don't, just get out it unchecked.
There's a lot of things you can do with this little tool. Check out how to use offset to perfection in Cricut Design Space.
Font Blazon
Every time y'all type something, Cricut Sans volition be the default font. If you lot desire to change the font, click on the Fonts drop-down bill of fare and choose your favorite font.
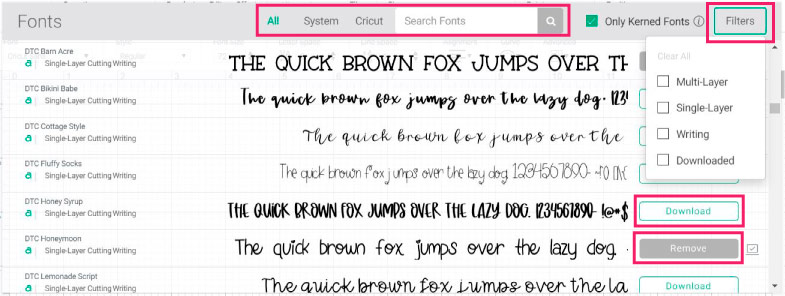
Go along in mind that not all fonts are free. If yous have Cricut Admission , yous can utilise most of them. Nonetheless, some of them need to be purchased prior to cutting your projection.
If you don't know what Cricut Access is, make sure to read this slap-up guide I put together.
If you lot desire to stick to free fonts, make sure to filter past "My Fonts" (This will include your system fonts and some Cricut Fonts that Cricut may take free at the moment.
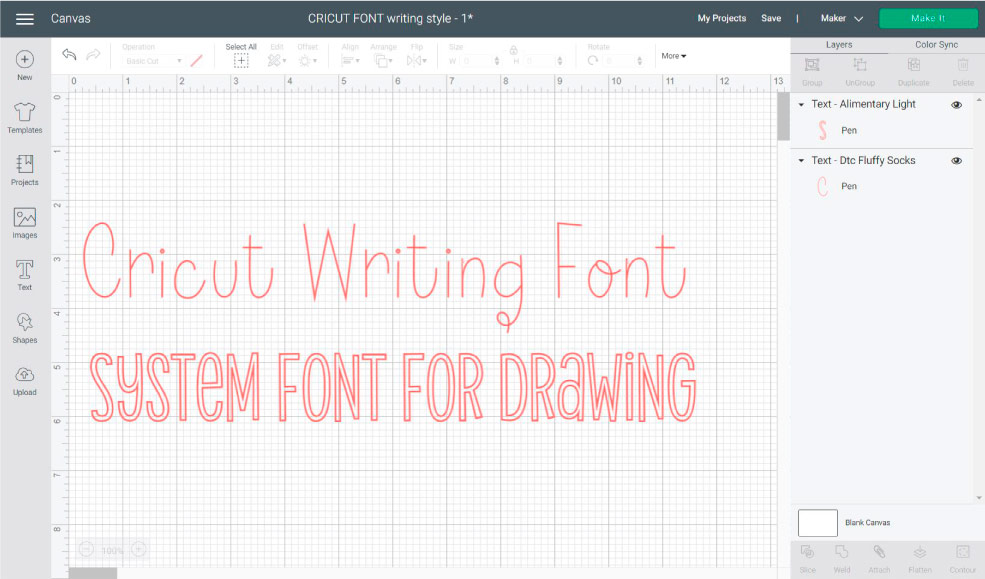
Something really cool most Cricut Fonts is the writing and Multi-layer Fonts.
Writing fonts are dandy for Cricut Pens and the Foil transfer kit because they volition give a hand-drawn event to your projects. Multi-layer fonts are a type font that consists of 2 or more layers.
Using Kerning in Cricut Blueprint Space
In the past, if you wanted to utilise a cursive font in Design Space, y'all had to practice a lot of steps to fix it because the letters weren't joined.
To have joined cursive letters, yous must check "Just Kerned Fonts," in the "Font" drop-down menu.
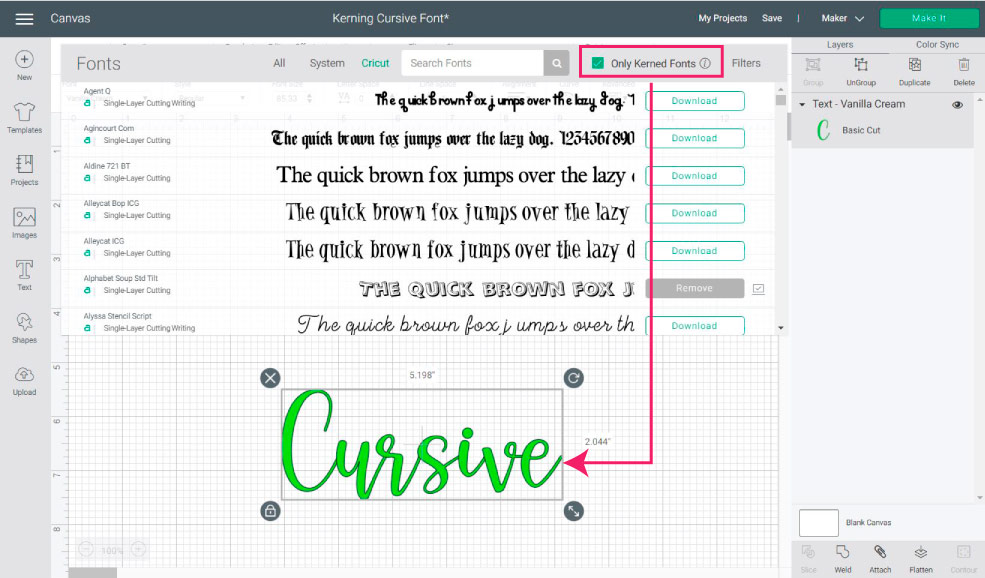
Kerned fonts volition look "welded" when you transport your project to cut, then there'due south no need for you to "Weld" them on the canvass area because you won't be able to edit your text.
From fourth dimension to time you'll find a font that won't work very well with kerning in Pattern Infinite. If that's the case, let me show y'all how to fix it.
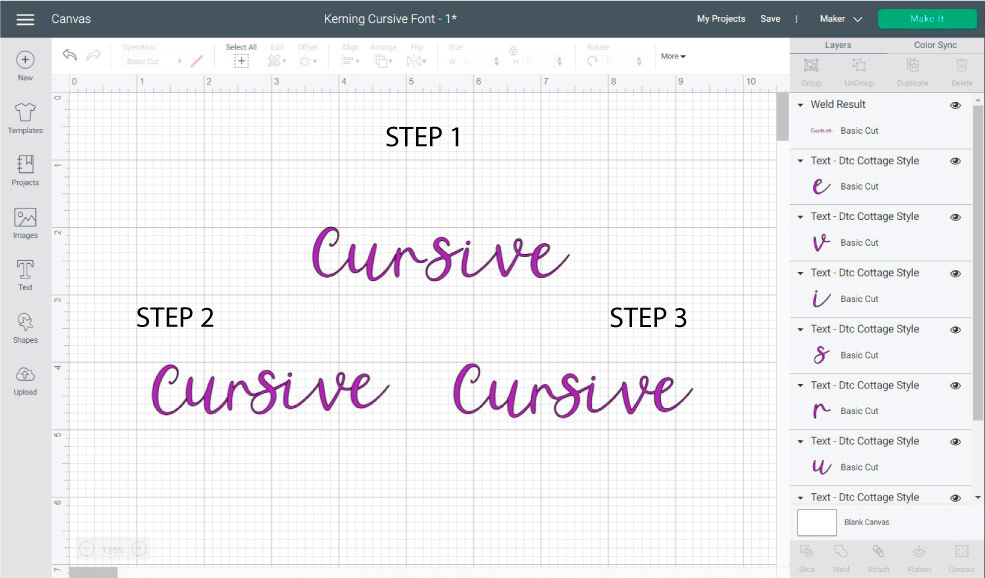
Stride 1: Write your pattern text, click on "Advanced," so select ungroup to letters so you can manipulate each one alphabetic character.
Step two: Connect the letters that need it.
Step 3: If you were going to cut your project correct at present, all letters would exist cut out individually. To make this a unmarried give-and-take, select all messages and click on the "Weld" tool located at the bottom of the right panel of the sheet area.
Font Style
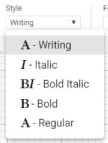
When yous click on font mode, you lot will be given a drop-down card. The most common options are Regular, Bold, Italic, and Bold Italic.
However, if you lot are using Cricut Fonts you may have more or less options similar "Writing."
The Big Difference between Cricut Fonts and Organisation Fonts
At that place's a big departure between the Cricut and System fonts. The Cricut Fonts are designed to fit all of the potentials of your auto.
Yous have the Writing – as a font manner – and the Multi-Layer options.
Certain, y'all can write with your system fonts – past changing the operation from cutting to "pen," but it would look more similar an outline of the font rather than a handwritten effect.
Learn how to use Cricut Pens.
If you are similar me and like "free", you can get away with free fonts if you know what to look for. I teach this on my "Best complimentary and premium fonts to employ with Cricut" article.
Font Size and Alphabetic character Spacing

Equally the name says, the font size will let you to modify the size of your selected text.
Letter of the alphabet Space is really cool because you lot tin adjust the space between messages.
Line Space is extremely cool as well, only this time you tin either increment or decrease the length of text lines.
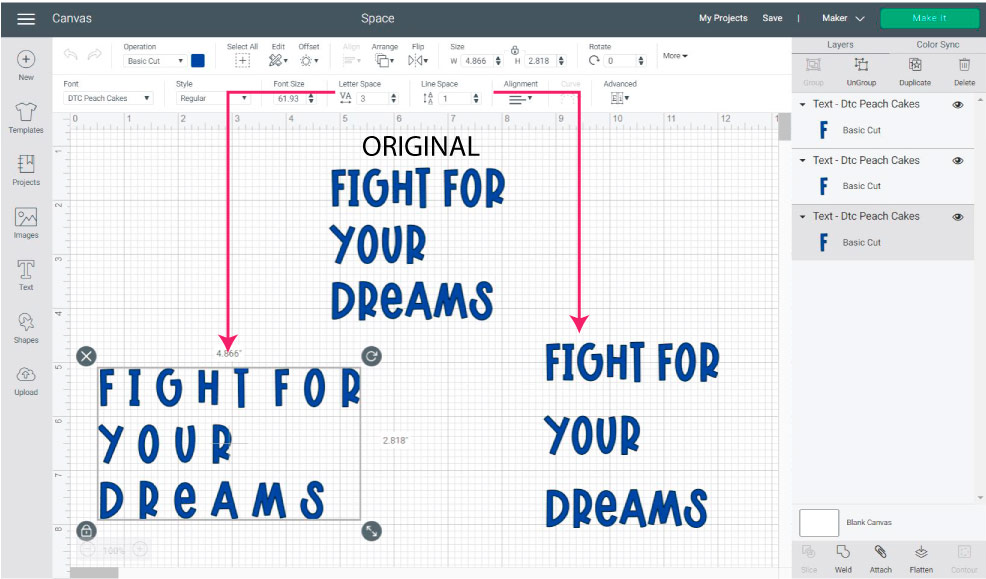
Text Alignment
This option will permit you to align paragraphs in iii different means:
- Left: Selected text volition be aligned to the left
- Center: Selected text will be centered
- Correct: Selected text will exist aligned to the correct
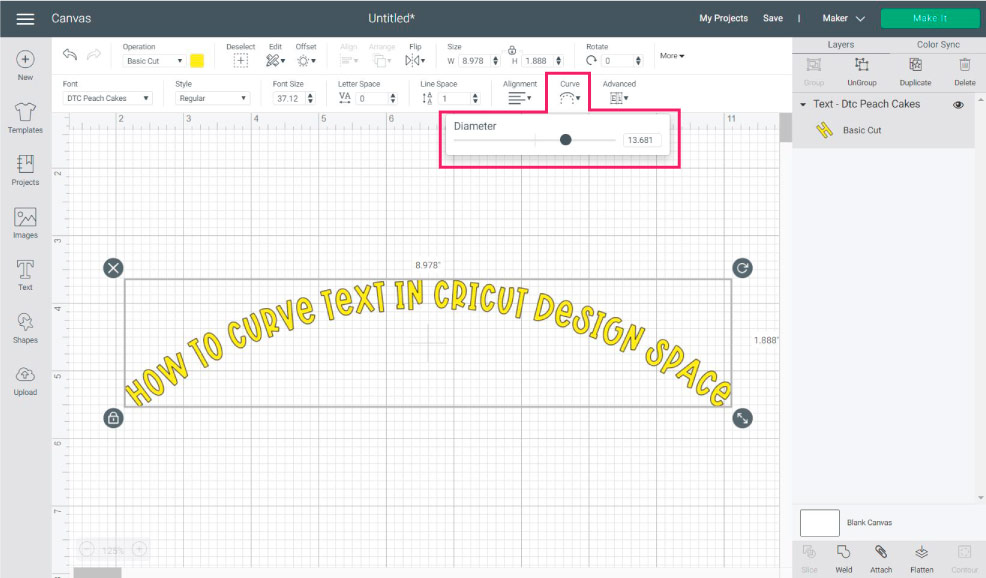
Curve Text
I love this feature! Curving text tin add an extra bear on to any design. However, this option is simply available for one line of text at a time; no paragraphs!
Tip: Ensure that when you write your line of text, you don't have the cursor on the second line of the text bock considering it will keep the "Curve" tool greyed out.
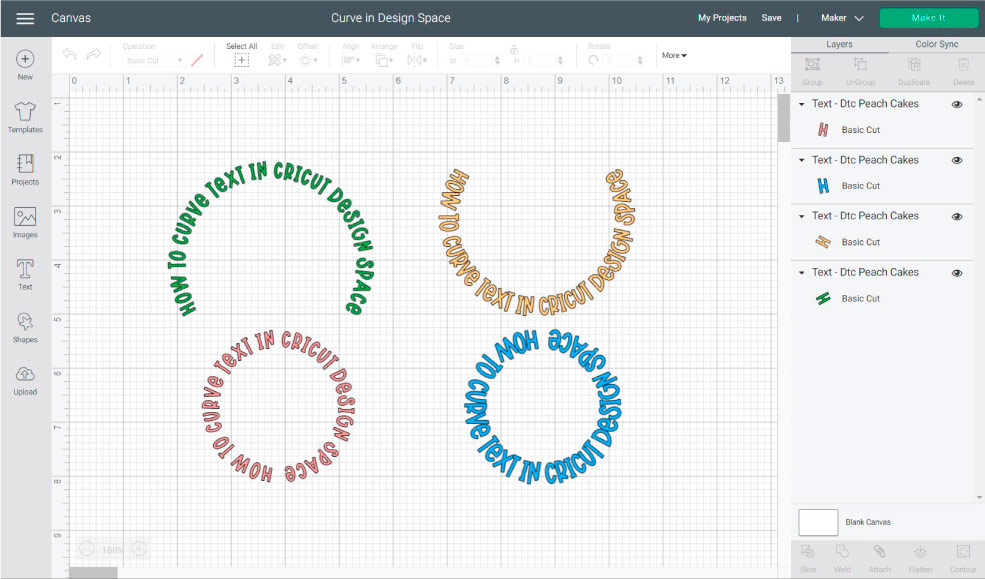
Select your text line and play with the curve option. The further you are from the eye the more curved appearance you will add to your text.
Hither are some examples of the aforementioned line of text while curving positive and negative.
Advanced Options
This is by far one of my favorite options and you lot may think is difficult because of the name of this icon!
For this example, I am using a Multi-Layer font called A Frightful Affair. This font is made out of two layers. An outer (black) and inner (imperial) i. Each layer may stand for a different material color when cutting your project.
Using this font, let's meet how each of one the "Avant-garde" options work.
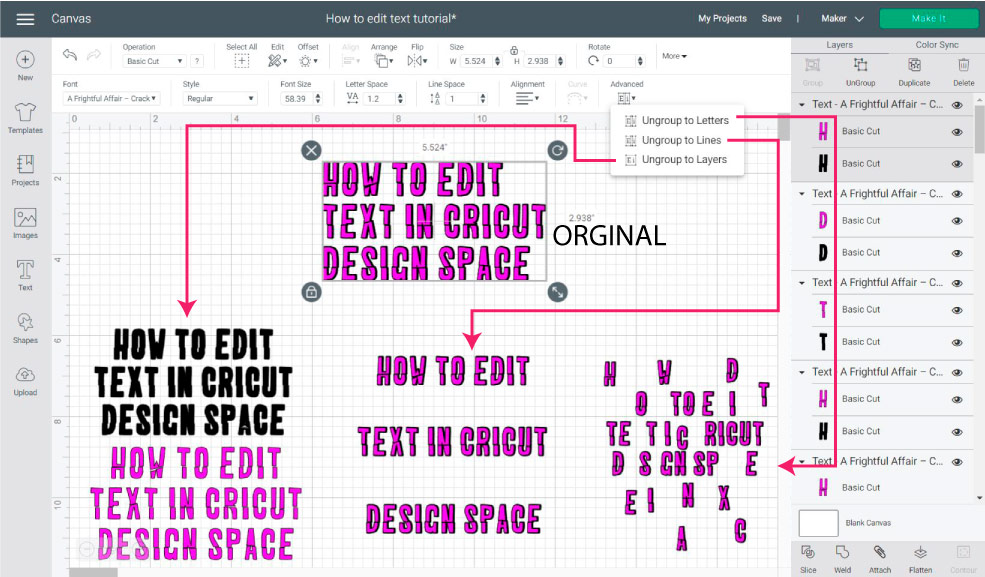
Ungroup to layers: This option is only bachelor on multi-layers fonts. When you click on this setting, you can separate all of the layers that brand upward the font and edit them individually. This is neat if you just want to use a particular layer of text.
Ungroup to lines: If y'all need to write a paragraph merely need all text lines on their own, this tool will be your best friend.
Write your paragraph, align and space your fonts and so click on ungroup to lines. And so, you lot can edit each line of text on its own!
Ungroup to Letters: This option allows you to separate every letter into a different layer; it can exist practical to a paragraph, line of text, or just whatever word.
Detect that when you lot divide to lines and letters, the font kept the multi-layer attribute. So, If you have a multi-layer font, you lot can ungroup to layers later using either ungroup to lines or letters.
Vertical Text in Cricut Pattern Space
Let's see the following epitome then you tin can have vertical text on your projects.

Step 1: Click on the text icon, then press "enter" on your keyboard after every unmarried letter. For instance "V" enter "E" enter, and and so on, until you complete your discussion.
Step two: Select text on sail, click on "Alignment" and select "center."
Step 3: You can adjust "Line Space" to brand letters closer or more apart.
Using the Attach tool with Text in Cricut Design Infinite
Let's say you want to add text to a card using pens, foil, etc. You lot need to tell your motorcar where you desire that text.
Attach joins the room!
In my opinion, "Attach" is the most important tool inside Cricut Design Space. Normally, this little setting is what causes THE MOST HEADACHES for beginners.
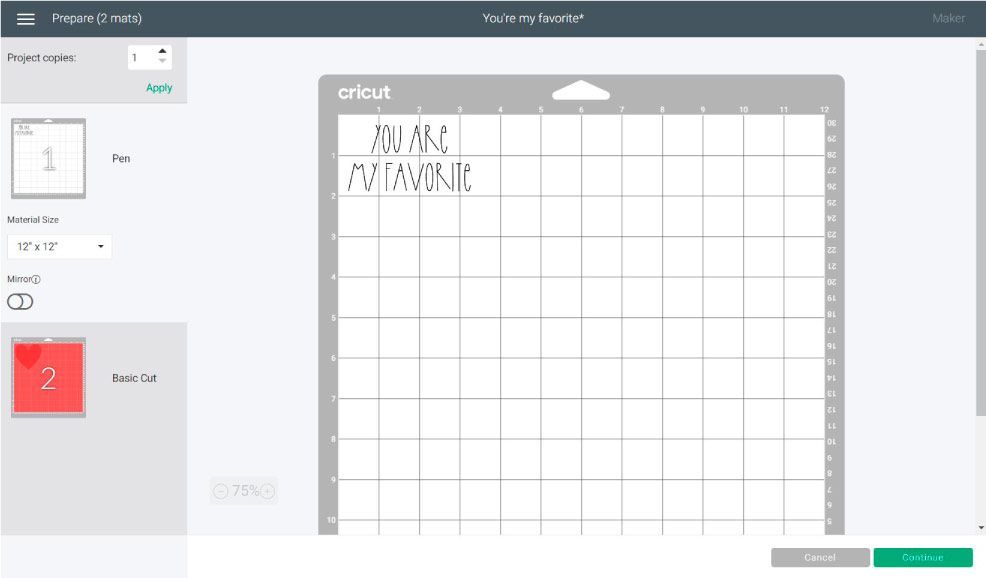
Permit's meet the following screenshot. It's a small center shape with some text on top of information technology. To tell your motorcar you want your text there, select both layers and click on "Attach."

When you click on "Make it" everything will expect just the information technology's supposed to!
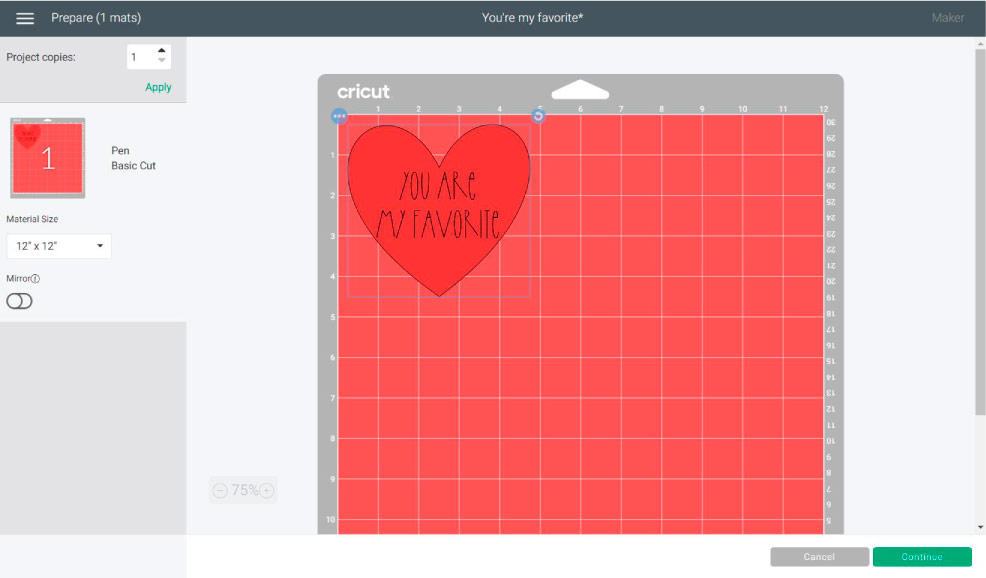
If you forget to attach, your text will be on a different mat, and it will drive y'all crazy!
If you're only learning your auto, check out my "Weld, Adhere, and Grouping" tutorial.
Think Exterior the Box when Editing Text in Design Space
I want to testify you two cool examples of what you lot can accomplish when y'all learn how to edit text in Pattern Space and how to turn a tedious looking design into a unique and creative one.
Making Text into a Heart in Blueprint Space
How virtually using multiple words to make a heart in Cricut Blueprint Space.
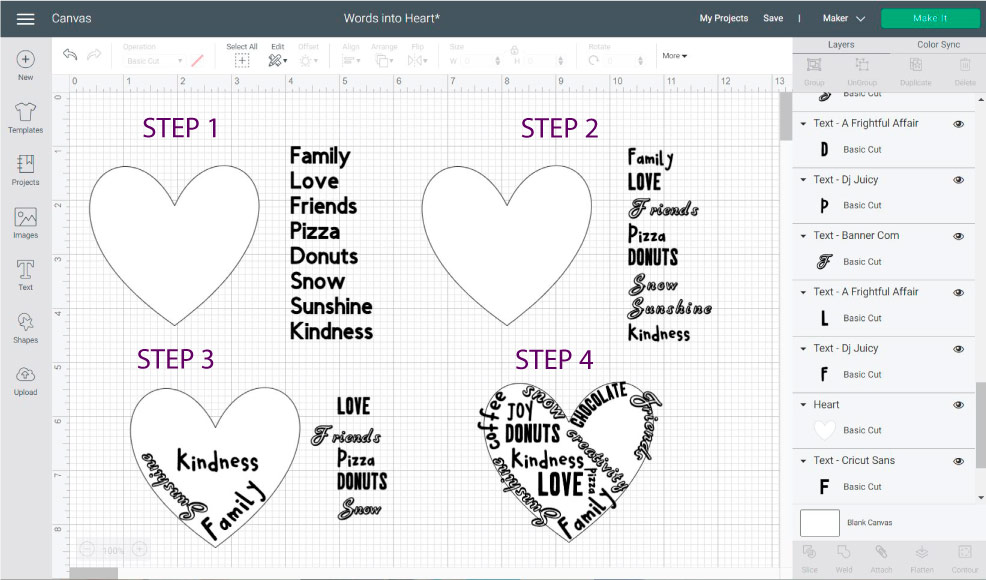
Stride i: Add a heart and text. Choose words that are meaningful to you, similar the proper noun of your little ones, the food you love, what you lot like to do, etc.
Step 2: Choose iii fonts you lot similar (less is more) and change the initial fonts. For this example, I used:
- A Frightful Matter
- DJ Juicy
- Banner Com
Step 3: It'southward time to fill your heart. Use the curve tool to fit some words around the edges. Then be creative and rotate in different directions to add life to your design.
Footstep 4: Continue calculation text. If you lot still take space for more words, don't exist afraid and add more. I added a couple of ones like chocolate, daydreams, joy, etc.
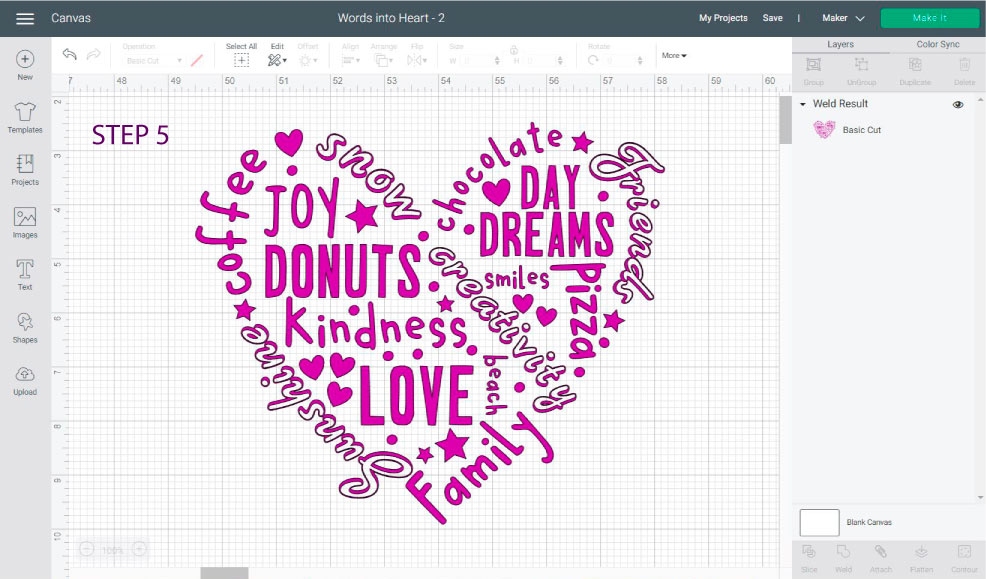
Step 5: If your middle has some spaces where you tin't fill up a word, but add shapes! Small circles, stars, and hearts. When your design is complete hibernate the eye and either weld (if y'all want a single layer) or adhere.
Turn Apparently text into a Beautiful quote
Sometimes we think nosotros need to have fantabulous mitt-lettering skills to have a fun blueprint. I wish I had some of those, but let's merely say I am not gifted in that area, lol. (I day, I gotta learn). So what are we going to exercise?
Well, work with what we take, fonts and shapes.
This is how nosotros do it:
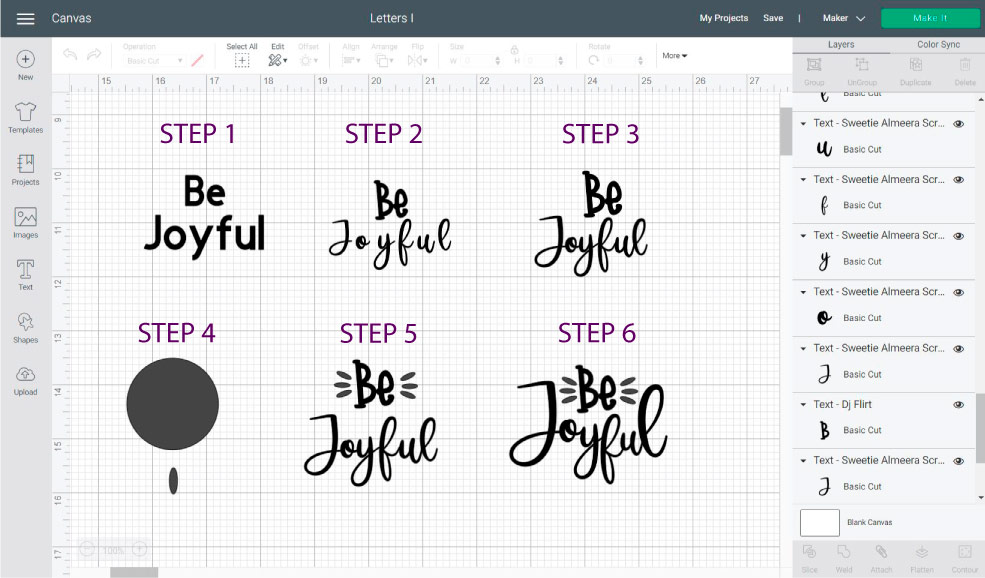
Pace one: Add together two different lines of text. (Or one paragraph and ungroup to lines)
Footstep 2: Choice two fonts that look adept together. Regularly, this is the hardest role. I took nearly 15 minutes trying to pair them. But you'll go ameliorate with time.
These fonts are:
- DJ Flirt for the "Exist"
- Sweetie Almeera Script (You lot accept to buy it, simply it'southward BEAU-TI-FUL
If using a script font, uncheck "Kerning fonts only" every bit yous learned in this tutorial.
Step three: Organize cursive font by reducing letter spacing so ungrouping to messages (click the text and get to the advanced options)
Footstep 4: Add a circumvolve and unlock proportions to make a modest oval.
Footstep five: Duplicate and rotate oval to complete glyphs. I usually like to do the ones on the left and so I select and copy them and flip them horizontally.
Read my how-to mirror and flip tutorial.
Step 6: If y'all didn't ungroup to messages on pace iii, now it's the time to do information technology. Modify each alphabetic character so it hugs the glyphs and the "be." Be creative!
Experiment. I had to double the size of the messages J and L and bring the other letters downwardly.
Step 7: When you are happy with the result, select all of your designs and click on "Weld."
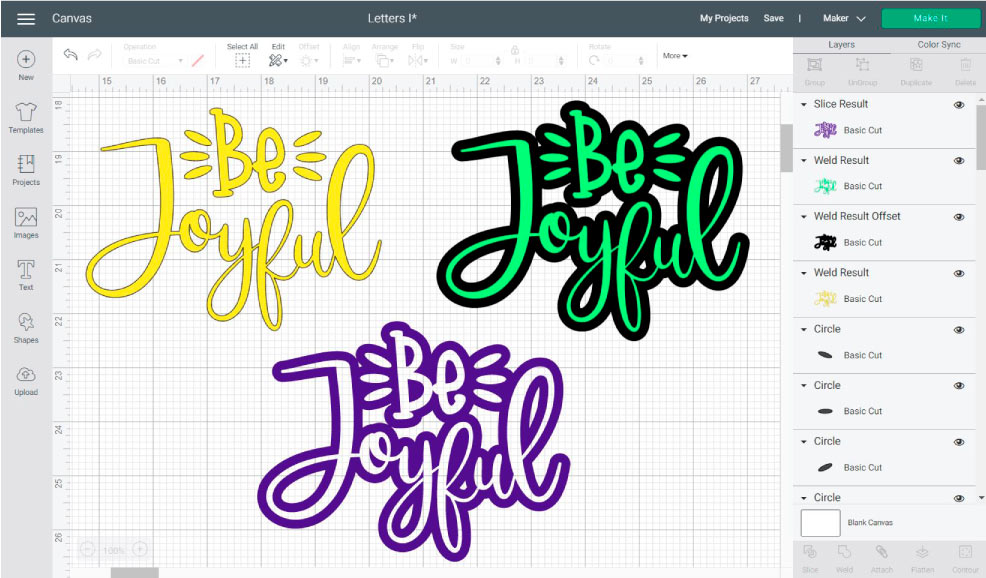
The yellow layer is how it looked, just you can edit the text even farther!
What about adding an offset. So beautiful! And to edit, even more, become ahead and select both the original and the get-go layers and "Piece" at the bottom of the layers panel.
You have something totally new.
You come across!
It's non that hard, you merely demand to practice, practice, practice!
That's it! You are a Pro Now!
Then…
What did you guys recollect? What kind of projects are you going to brand now that y'all are a Pro at editing text in Cricut Blueprint Space?
I tin can't wait to hear all about so make certain to comment on the section downward below
Do you know that it takes me over 25 hours of work to complete a single Cricut article? I know, it'southward crazy! Simply I like to brand certain that you understand EVERYTHING!
I would capeesh your support on Instagram / Pinterest / YouTube / as I am trying to abound my audience to keep producing bang-up content!

Source: https://www.daydreamintoreality.com/edit-text-cricut-design-space/
Posted by: garcialuxual63.blogspot.com
0 Response to "How To Change Font On Cricut Design Space"
Post a Comment